 General Information
Green Roofs
Rainwater Harvesting
Ponds and Wetlands
Energy-Efficient Building
Design Principles
Weatherseals
Building Gaskets
Glazing Gaskets
Timber Glazing
Air-Vapor Films
Attic Access
Ventilation
Sealants
Shim Screws
Wood Repair
Documents
Waterproofing

WOOD REPAIR SYSTEM
There are many reasons to repair wood windows and doors instead of replacing them. Wood used in older windows and doors was milled from select mature trees and is more resistant to decay and warping than currently available domestic woods. It is usually less expensive to repair windows and door than it is to replace them, especially when the woodwork is large or complex. Repairing is also preferable for reasons of historic preservation and environmental conservation.
Our wood repair system is based on a unique epoxy compound with cured properties similar to wood. It is supplied in a dual-cartridge system that assures precise mixing and easy application. It does not slump or sag, even in very thick applications, and works on both horizontal and vertical surfaces. It tools well, has a long working time (30 minute minimum), doesn’t shrink (less than 1%), and is easily sanded and painted. It bonds exceedingly well with wood and does not become brittle with age.
In comparison, other wood repair systems all have serious limitations. Polyester wood fillers (Minwax, Bondo) are less flexible than epoxies and don’t adhere as well to wood. Marine epoxy systems (WEST) require complicated mixing and are often too brittle. Consolidation systems (Abatron) recommend application over deteriorated wood fibers, risking bond failure due to expansion and contraction, leading to further decay.
MATERIALS REQUIRED: One epoxy cartridge yields 24 cubic inches, roughly the size of a grapefruit or softball. Order one primer for every four epoxy cartridges. When stored in a cool environment, primer and epoxy cartridges have a one-year shelf life. Static mixers, mixing cups, primer brushes, and gloves are designed for a single use.
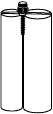
epoxy cartridge |
primer |
static mixer |
|
standard
|
high-pressure
|
||
disposable |
disposable |
disposable |
disposable |


PREPARATION: The temperature must be at least 40°F and rising. In warm weather, do not work in direct sunlight. Surfaces must remain dry until the epoxy is cured and painted, so postpone exterior work when rain is anticipated within 24 hours. If a moisture meter is available, verify that the wood moisture content is less than 18%. The repair compound contains no VOC’s but interior workspaces should be well-ventilated. Wear plastic gloves to avoid skin contact.
APPLICATION PROCEDURE: Begin by removing all paint near the area to be repaired. If stripping with heat, be careful to avoid burning since epoxy will not bond properly to burnt wood. For best results, we recommend our infrared paint stripper (see separate information sheet). Sand the surface to bare wood and remove fibers, paint residue, sawdust, and dirt. Remove all decayed wood to expose sound, bright wood (no red-brown or gray spots). Enlarge any cracks and joints to at least 1/4” wide by 1/2” deep. Then follow the following procedures:

Step 1: Mix the primer in a disposable plastic cup:
add
two capfuls of part A to one capful of part B.
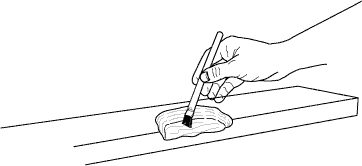
Step 2: Apply the primer with a small disposable brush, wait ten minutes,
and then remove excess liquid with a paper towel. Primed surfaces must
be coated with epoxy within twenty minutes, or they must be re-primed.

Step 3A: When using a high-pressure gun with a static mixer
(a special mixing nozzle), simply extrude pre-mixed epoxy into place.

Step 3B: When using a standard gun, extrude ribbons of both components
(automatically proportioned by the gun) onto a clean surface...

... and then mix both components thoroughly with a putty knife.

Step 4: Spread epoxy over the area to be repaired, filling the
full thickness required, and tool the surface to the final shape.
Wait 12 hrs at 70°F for the epoxy to cure (longer if colder).

Step 5: Sand the epoxy as needed. Remove all dust and
inspect
the repair. If needed, apply a second coat, sand
again, and remove all dust. Then paint as you would any
bare wood surface: never leave the epoxy unfinished!
PRICING: Call or email for current pricing.