 General Information
Green Roofs
Rainwater Harvesting
Ponds and Wetlands
Energy-Efficient Building
Design Principles
Weatherseals
Building Gaskets
Glazing Gaskets
Timber Glazing
Air-Vapor Films
Attic Access
Ventilation
Sealants
Shim Screws
Wood Repair
Documents
Waterproofing

SHIM SCREWS
To operate properly, windows and doors must be securely fastened with plumb jambs and level headers. Traditionally this has meant carefully shimming and nailing the perimeter, a time consuming procedure that requires considerable experience to achieve accurate results. In addition, the shims make it impossible to achieve the continuous air seals required for energy-efficient building. More recently, windows are often supplied with nailing flanges designed to be fastened to the exterior sheathing. Although these flanges significantly speed installation, they don’t offer the strength or accuracy of properly installed wood shims. Neither nailing flanges nor shims can be adjusted to compensate for framing shrinkage or settling.
Our shim screws can replace shims and supplement nailing flanges, overcoming the limitations of both. Each screw consists of a threaded outer sleeve with a captured free-spinning lag screw through the center. A special installation tool is used to grab both parts simultaneously and to twist them into a pre-drilled hole in the window or door frame. Then the inner part of the same tool is used to turn only the lag screw while the outer sleeve remains fixed. Since the lag screw is captured in the sleeve, turning the screw into or out of the rough framing lumber causes the window or door frame to move in the desired direction.
cross-section showing window or door frame (left),
shim space
with gasket (center), and rough frame (right)
Shim screws are quick and easy to install, are extremely strong, and permit precise adjustment. The window or door frame is suspended in the rough opening, leaving an uninterrupted space that can be easily air-sealed with a gasket or spray-applied foam. When used in conjunction with our EPDM building gaskets, window and door frames can be re-adjusted years later to compensate for framing shrinkage or settling.
SELECTING A SHIM SCREW: Stock shim screw lengths are 60mm (2-3/8”), 80mm (3-1/8”), 100mm (4”), 120mm (4-3/4”), and 140mm (5-1/2”), with longer lengths available on special order. Screws are sold individually and in boxes of either 50 or 100, depending on length. To select the best size, add the thickness of the window or door frame to the shim space and consult the table. Order a minimum of four screws for windows and six for doors.
| frame thickness + shim space | shim screw |
| 3/4” - 1-3/4” | 60 mm |
| 1-1/4” - 2” | 80 mm |
| 2” - 2-3/4” | 100 mm |
| 2-3/4” - 3-1/2” | 120 mm |
| 3-1/2” - 4-1/4” | 140 mm |
60mm
|
80mm
|
100mm
|
120mm
|
140mm
|
INSTALLING A SHIM SCREW: Following is the installation sequence for installing a shim screw through a finished window or door jamb and into a stud that forms the side of the rough opening. You will need a drill, a 5/16" drill bit, and a shim-screw adjusting tool.

STEP 1: Drill a 5/16” hole through the window or door jamb
or header and approximately 1/8” into the rough building framing.
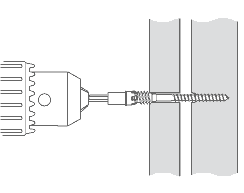
STEP 2: Insert the shim screw using the drive tool which
simultaneously turns the outer sleeve and the inner lag screw.

STEP 3: After driving the screw flush with the finished surface,
remove the outer part of the drive tool to expose the inner adjuster.

STEP 4: Using the adjuster, turn the lag-screw clockwise to move
the jamb outward or counter-clockwise to move the jamb inward.

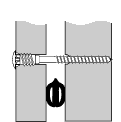
STEP 5: If no molding will hide the shim screw, insert a plastic
cap (beige, medium brown, dark brown, black, gray, white).
Caps can be easily removed for future adjustments.
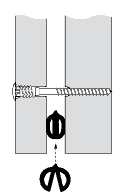
STEP 6: For optimal energy efficiency, seal the gap between
the finished and
rough
framing with BG44, BG46, or BG48 gaskets. (Note: Illustration shows top view of jamb.)
PRICING: Call or email for current pricing.