 General Information
Green Roofs
Rainwater Harvesting
Ponds and Wetlands
Energy-Efficient Building
Design Principles
Weatherseals
Pricelist
Corner-Grooving System
Caulkable Cornerseals
Adjustable Door Bottom
Automatic Door Bottom
Jamb Seals
Bottom Seals
Center Seals
Sliding Seals
Techniques
Building Gaskets
Glazing Gaskets
Timber Glazing
Air-Vapor Films
Attic Access
Ventilation
Sealants
Shim Screws
Wood Repair
Documents
Waterproofing

WEATHERSEALS: ADJUSTABLE DOOR BOTTOM
Door bottom weatherseals can be located in one of three places: in the threshold, in the bottom of the door, or on the surface of the door (inside, outside, or bottom). Grooving a seal into the bottom of the door is the most attractive of the three options and offers maximum protection from mechanical damage. The challenge is to find a system that can be easily adjusted to make a perfect seal but that is reliable and economical. Our solution is a unique concealed door-bottom system that can be fully adjusted in minutes without removing the door and has been proven to be virtually maintenance free after decades of use.
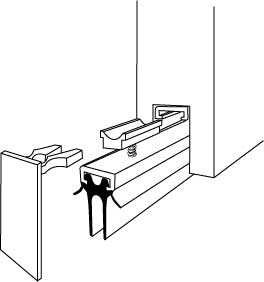
Our adjustable door bottom system can be removed
through the door edge for precise adjustment in minutes.
iNSTALLATION: The system is based on our WS25 silicone double sweepseal and two of our WS56 aluminum channels cut 1/8” shorter than the door width. A 5/8” x 1-1/8” (16mm x 28mm) groove must be routed into the door bottom, typically by positioning the door horizontally on sawhorses and making multipe passes with a router, using a guide fence. The first WS56 channel is permanently screwed into the groove and the door is hung. WS25 silicone sweepseal is pressed into the second WS56 channel and WS93 glides are screwed into pre-drilled holes in this channel. Then this second channel is slid through the edge of the door into the pre-attached channel. WS93 end caps snap into the channel to close the groove.

WS25 is manufactured with a “bridge” that helps it keep its
shape. Tear this out carefully before installation.

Insert WS25 silicone into WS56 channel by spreading
the flaps with your thumbs while pressing firmly. It helps
to insert only one lip at a time. A WS96 roller tool can
be used to speed insertion. Do not use lubricants!
ADJUSTMENT: The system is adjusted without removing the door. First, the end cap is removed and the seal assembly is slid out the edge of the door. Then, the glide screws are turned clockwise to raise the sweep or counterclockwise to lower it. Since each glide is independent, the seal can be adjusted to make a curve to follow dips in worn thresholds. Finally, the seal assembly is slid back into the door and the end cap is replaced. The entire process only takes a few minutes and results in a perfect fit. Unlike other adjustable door bottom systems, there are no moving parts, so there’s nothing to jam from corrosion or dirt. Since the sweepseal can be easily adjusted for wear, replacement is rarely needed.
Note that the channel screwed to the door bottom MUST be pewter color, our designation for a clear-anodized finish which is essential to assure the glides will slide freely after many years of use! Although mill-finish channel can be used for the second channel that holds the WS25, to avoid confusion we suggest using the pewter finish for both. Order one WS93 glide per each foot of door width, extra where thresholds are very uneven.