 General Information
Green Roofs
Rainwater Harvesting
Ponds and Wetlands
Energy-Efficient Building
Design Principles
Weatherseals
Pricelist
Corner-Grooving System
Caulkable Cornerseals
Adjustable Door Bottom
Automatic Door Bottom
Jamb Seals
Bottom Seals
Center Seals
Sliding Seals
Techniques
Building Gaskets
Glazing Gaskets
Timber Glazing
Air-Vapor Films
Attic Access
Ventilation
Sealants
Shim Screws
Wood Repair
Documents
Waterproofing

WEATHERSEALS: AUTOMATIC DOOR BOTTOM
There are situations where even the best constant-height door bottom weatherseals, such as our Adjustable Door Bottom System, will not work. Where there is no threshold, or where the interior surface is as high as the threshold, a constant-height door bottom seal will rub and is likely to jam as the door opens. Common examples are commercial buildings where thresholds would present a trip hazard, residences in the Southwest US and Hawaill where it is popular to design tile or wood floors that extend seamlessly to the exterior, vestibules with thick interior floor mats or rugs, and any building where the floor slopes upward significantly towards the interior so that the clearance under the door decreases as the door opens.
A simple solution is to use an automatic door bottom, a device that drops from the door bottom each time the door closes and retracts each time the door opens. Unfortunately, the problem with most automatic door bottoms is that first they drop to seal the hinge side of the door and then they pivot down to seal the remainder of the door bottom. This motion does not occur instantly, but rather over the last few inches of door travel, causing drag and resistance as the door closes and then later as the door opens. Another problem with automatic door bottoms is that they easily jam, can only be cleaned and repaired by removing the door, and often use unforgiving weatherseal inserts.
Our automatic door bottom drops |
... and retracts parallel |
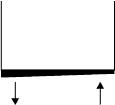
Turning an adjusting screw |
... or to the right to compensate |
Our solution is a unique automatic door-bottom system that uses a scissors mechanism that causes the door bottom to raise and lower in a parallel, pivot-free motion that results in rapid contact at the very end of the door travel and instant breakaway as the door opens. Both the height and the tilt angle can be fully adjusted in minutes without removing the door, and the entire mechanism slides out of the door edge while the door is standing for cleaning and repair. Grooves at the bottom of the operable part of the mechanism can hold from one to three of our standard door bottom seals, including flexible silicone sweeps and durable nylon brushes. Silicone rubber side wipers are included to prevent air from short-circuiting around the mechanism.

Our automatic door bottom system can be removed
through the door edge for cleaning and repair.
iNSTALLATION: The system consists of two main parts: an outer U-shaped mounting channel that is screwed to the door bottom, and an inner operating mechanism that moves up and down when the door opens and closes. Entire mechanism is concealed within a groove routed in the center of the bottom of the door,
Cut a groove measuring 3/4" (19mm) wide and 1-1/8" (28mm) deep, typically by positioning the door horizontally on sawhorses and making multipe passes with a router, using a guide fence. Remove both end caps from the mounting channel and verify that the operating mechanism is slid as far as possible into the mounting channel. Measuring from the button end, mark a length 1/4" shorter than the door width and cut through both aluminum channels at the same time with a miter saw.
After cutting, slide out the operating mechanism. Insert the end cap with one small hole in the end of the mounting channel, and insert the end cap with two large holes in the other end. Position the channel in the groove so that the end cap with the two large holes is on the hinge side of the door. If you have cut properly, the end caps should be flush with the door edges. If this is the case, screw the channel into place with the screws provided. If the end caps protrude from the door edge, re-install the operating mechanism in the mounting channel and re-cut both together.

Screw the mounting channel into a
3/4" x 1-1/8" groove cut in the door bottom.
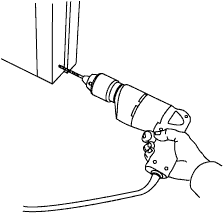
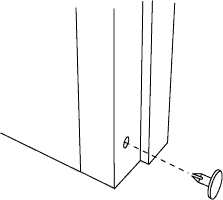
After the mounting channel is screwed in place, remove the end cap with the two large hole, and slide in the operating mechanism. Close and open the door several times so that the push button makes small imprint on the jamb: if no mark is visible, try rubbing the lead of a pencil on the end of the push button and close the door again to transfer the carbon imprint to the wood. Then drill a 1/4" diameter hole at the mark and press in the round plastic bearing plate. Slide out the operating mechanism and insert the silicone-rubber or nylon-brush weatherseals so that they are flush with the ends of the movable channel. Then slide the mechanism back into place and insert the end cap with two large holes.
drill a 1/4" hole where the push |
insert the plastic push plate |

press in weatherseals, typically two
WS17, WS18, WS62, or WS64
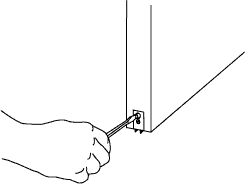
ADJUSTMENT: The system is adjusted without removing the door. Simply twist the push button in or out with a screwdriver so that the weatherseal just barely touches the threshold (or the floor if there is no threshold) when the door is fully closed. If one side touches but there is a gap on the other side, twist the small screw below the push button to adjust the tilt angle.

cross-section of automatic door bottom system
showing upper pushbutton and lower tilt screw

Turn the top screw until
the weatherseal touches

Turn the bottom screw until
the weatherseals are parallel
to the threshold or floor.


