 General Information
Green Roofs
Rainwater Harvesting
Ponds and Wetlands
Energy-Efficient Building
Design Principles
Weatherseals
Pricelist
Corner-Grooving System
Caulkable Cornerseals
Adjustable Door Bottom
Automatic Door Bottom
Jamb Seals
Bottom Seals
Center Seals
Sliding Seals
Techniques
Building Gaskets
Glazing Gaskets
Timber Glazing
Air-Vapor Films
Attic Access
Ventilation
Sealants
Shim Screws
Wood Repair
Documents
Waterproofing

WEATHERSEALS: TECHNIQUES
WORKING WITH SILICONE RUBBER: Most of our silicone seals have a mineral talc coating which keeps them clean and makes them easier to install and use, with the exception of our caulkable cornerseals WS02, WS03, WS04, WS05, and WS06 which are made without talc since talc would interfere with adhesion. Un-talced silicone acts like a magnet for dirt, so keep them sealed until the moment they are to be installed. If caulkable cornerseals do get dirty, clean them by pulling through a clean cloth wet with toluene, xylene, or MEK solvent available from a paint store. Always wear protective gloves when using solvent.

Cut silicone weatherseals
with a sharp utility knife.
Corners of tubeseals should be cut square and butted to each other for the best seal: if you try to wrap around the corner without cutting you may get some air leakage. Flipperseals can also be butted, but they look and seal better if carefully mitered while the seal is compressed to the recommended gap-spacing. Small seals can be cut with a scissors, but large seals should be cut with a sharp knife against a block of wood, preferably pre-grooved to hold the seal. We do not recommend trying to caulk corners with silicone caulk since it doesn't work very well and corner leakage is rarely significant with our weatherseals. Avoid stretching jamb seals during installation since silicone has an excellent memory and will try to pull back to its original shape, possibly creating a gap at the corners. First cut the seals to the full length required and "tack" in the two ends by pressing with your finger. Then tack in the middle, then the middle of each half, then the middle of each quarter, and so on until the seal has been tacked in slightly every six to eight inches. Then seat the seal fully by rubbing with a finger or rolling with WS96. If grooves are cut to specifications, our silicone seals will never loosen and fall out. We recommend our custom router bits for the best fit, but grooves can be cut on any table saw or shaper equipped with an effective hold-down system to avoid widening the ends of a cut. If the grooves are cut too wide, apply some silicone caulk for the first few inches.

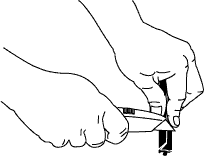
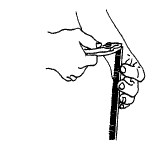
crimp ends of nylon
brushes to retain bristles
WORKING WITH NYLON BRUSHES: Cut the steel backing of WS62, WS64, or WS66 nylon brushes with a tin snips, pliers, or a hacksaw. To keep the bristles from falling out, use a pliers to pinch the ends of the metal closed as shown in the illustrations. The brushes should slide freely into WS40 or WS42 channel so they can be easily replaced in the future if they wear. Since cutting the brush often deforms the backing or leaves burrs that make it too large for the aluminum channels, it may be necessary to lightly file the ends of the steel backing until the brush enters easily. On the other hand, if the brush is too loose, bend the backing very slightly in a few places so that it will spring tightly against the sides of the aluminum channel.

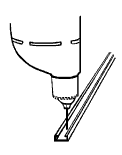
Drill extra holes
where required.

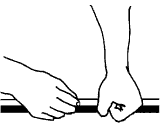
Tap WS42 onto
concealed clips.
WORKING WITH ALUMINUM CHANNEL: Aluminum channel can be cut with a hacksaw and miter box, or with an electric miter saw. When using a miter saw, use a blade designed for non-ferrous metals, apply lubricating wax to the blade, and always clamp thin metal channels tightly between a block of wood and the fence. When cutting several channels to the same length, nest them together tightly, tape the bundle, and then cut them all at the same time. WS50 and WS56 channels are supplied pre-drilled, but it may be necessary to drill additional holes near the ends: this can be done with an ordinary twist bit. WS50 channel is attached with special screws (included) that can be driven in like nails yet hold like screws and can be removed with a screwdriver. These fasteners are very small and difficult to handle, so we offer a special setting tool WS94 to get them started. A screw is inserted into the hollow center of the tool so that the tip protrudes from the end, and the tool is struck with a hammer. The screw is then set the remainder of the way with a nailset. WS42 aluminum channels are fastened with concealed plastic clips that are screwed into a window, door, or jamb. Locate the center of the clips using the measurements in the installation drawings, fasten them with the screws provided, and then align the clips using the edge of the channel as a straight-edge. Position the large groove on the back of the channel over the clips and strike the channel firmly with your fist or a rubber mallet. The channel will snap onto the clips and will grip tightly. To remove the channel, pry it off one clip at a time (example: door jambs) or slide it off to the side (example: door bottoms).