 General Information
Green Roofs
Rainwater Harvesting
Ponds and Wetlands
Energy-Efficient Building
Design Principles
Weatherseals
Pricelist
Corner-Grooving System
Caulkable Cornerseals
Adjustable Door Bottom
Automatic Door Bottom
Jamb Seals
Bottom Seals
Center Seals
Sliding Seals
Techniques
Building Gaskets
Glazing Gaskets
Timber Glazing
Air-Vapor Films
Attic Access
Ventilation
Sealants
Shim Screws
Wood Repair
Documents
Waterproofing

WEATHERSEALS: BOTTOM SEALS
The following drawings show door bottoms, but many of the same techniques can be used for the bottoms of inward-swinging windows. The arrow symbol indicates the direction of motion of a door or window as it opens. This can be horizontal with hinged doors or windows, or vertical with overhead doors or double-hung windows. All bottom seals are designed to be used with thresholds so that the seal only makes contact when the door or window closes. Use silicone sweepseals with smooth thresholds such as wood, metal, or marble; use nylon brushseals with rough thresholds such as brick or concrete. Excessive bending will shorten the life of either and may cause binding.
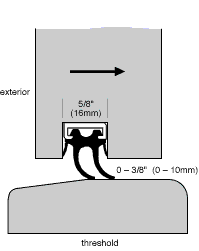
WS25 IN WS56
Cut a 5/8" (16mm) wide groove so that the
groove depth plus the largest gap at the
bottom totals 13/16" (20mm). Screw in the
channel, shimming as necessary to
compensate for uneven thresholds.
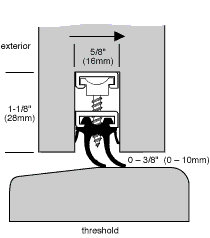
ADJUSTABLE VERSION OF WS25 IN WS56
Screw one pewter finish WS56 channel into the
groove. Insert WS25 sweep into a second WS56
channel and screw three or four WS93 glides into
the second channel and through the rubber. Twist
the glides in or out to adjust the height and slide
the sweep assembly into the fixed channel.
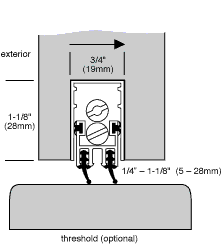
WS58 AUTOMATIC DOOR BOTTOM WITH WS17
Screw the mounting channel of WS58 into the
groove. Insert weatherseals (maximum gap
depends of choice of seals) into the moveable
mechanism and slide the mechanism into channel.
Adjust the height and tilt angle with the end screws.
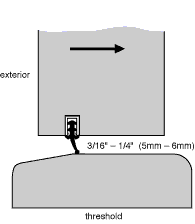
WS17 IN WS40 IN DOOR BOTTOM
Install a WS40 channel into a 3/16" x 5/16" (5mm
x 8mm) groove and insert a WS17 sweepseal.
If the bottom gap is less than 3/16", recess the
WS40 into the wood. WS40 will stay in place with
friction alone, but using glue will seal the wood
better in very wet locations. While WS17 could
also be inserted directly into wood, WS40
significantly improves the pullout resistance.
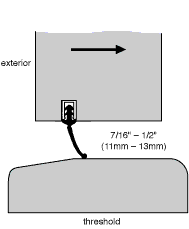
WS18 IN WS40 IN DOOR BOTTOM
Install a WS40 channel into a 3/16" x 5/16" (5mm
x 8mm) groove and insert a WS18 sweepseal.
If the bottom gap is less than 7/16", recess the
WS40 into the wood. WS40 will stay in place
with friction alone, but using glue will seal the
wood better in very wet locations. While WS18
could also be inserted directly into wood, WS40
significantly improves the pullout resistance.
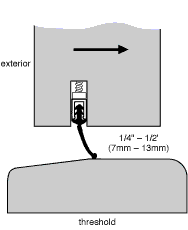
ADJUSTABLE VERSION OF WS18 IN WS40
To make a WS18 sweepseal adjustable, cut a
3/16" x 5/8" (5mm x 16mm) groove and insert
#4 x 3/4" screws at the base of the groove to limit
the depth of penetration of the WS40. Although
doors must be removed to adjust the screws, no
re-grooving or shimming is required. Substitute
WS17 for gaps less than 1/4"" (6mm).
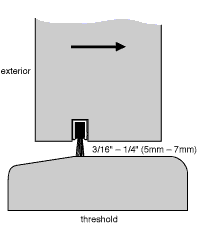
WS62 IN WS40 IN DOOR BOTTOM
Install a WS40 channel into a 3/16" x 5/16" (5mm
x 8mm) groove and insert a WS62 brushseal.
If the bottom gap is less than 3/16", recess the
WS40 into the wood. WS40 will stay in place
with friction alone, but using glue will seal the
wood better in very wet locations. If the bottom
gap is larger than 1/4", use WS64 or WS66.
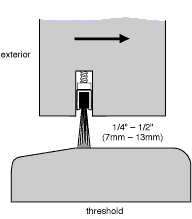
ADJUSTABLE VERSION OF WS64 IN WS40
To make a WS64 brushseal adjustable, cut a 3/16" x 5/8"
(5mm x 16mm) groove and insert #4 x 3/4" screws at the base
of the groove to limit the depth of penetration of the WS40.
Although doors must be
removed to adjust the screws,
no re-grooving or shimming is required. Substitute
WS62 for smaller gaps and WS66 for larger gaps.
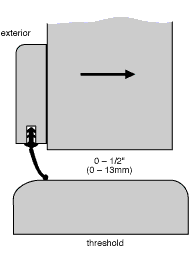
WS18 IN SURFACE MOLDING
Cut a 1/8" x 1/4" (3mm x 6mm) groove in any
molding and screw the molding to the exterior
surface so that the sweep just begins to bend.
WS17 can be used for gaps 0 – 1/4" (0 – 6mm).

WS64 IN WS40 IN SURFACE MOLDING
Cut a 3/16" x 5/16" (5mm x 8mm) groove in any
moulding, glue in WS40 channel, and screw the
molding to the exterior surface so that the brush just
begins to bend. WS62 can be used for gaps 0 – 1/4"
(0 – 6mm); WS66 for gaps 0" – 3/4" (0 – 19mm).
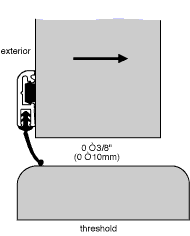
WS18 IN WS42
WS42 channel snaps onto delrin clips
(included). Drill screw pilot holes for the clips
5/16" (8mm) below a pencil line drawn at the
top of the channel when the sweep is just
slightly bent. The bottom of the channel should
be above the bottom of the door or window.
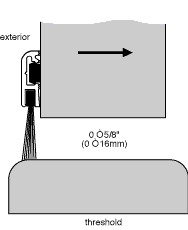
WS66 IN WS42
WS42 channel snaps onto delrin clips
(included). Drill screw pilot holes for the clips
5/16" (8mm) below a pencil line drawn at the
top of the channel when the brush is just slightly
bent. The bottom of the channel should be
above the bottom of the door or window. WS64
can be used for gaps 0 – 3/8" (0 - 10mm).
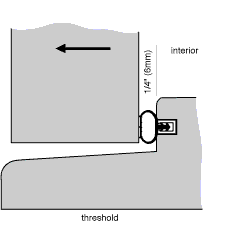
WS11 IN WS40 IN RABBETED THRESHOLD
The bottoms of outward-swinging doors can be
sealed with silicone tubeseals or flipperseals
grooved into the edge of a rabbeted threshhold.
This method gives excellent results because the
seals on all four sides of the door are continuous.
WS11 is shown, but WS10, WS12 , WS14, or
WS15 could be used. WS40 should always be
glued into the threshold to seal the groove.
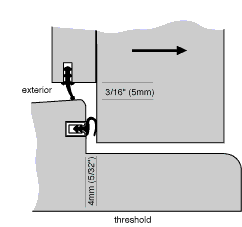
WS17 IN MOLDING + WS12 IN WS40 IN RABBET
Rabbeted threshold seals are feasible for
inward-swinging doors, provided an exterior rain
diverter stops water from running over the
threshold. The threshold edge seal becomes the
air seal only. Here WS17 is shown grooved into a
wood molding applied to the exterior surface and
WS12 in WS40 is grooved into the threshold, but
other variations are possible.
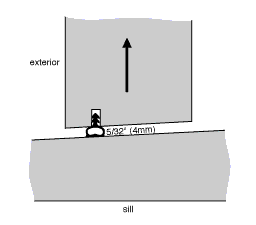
This detail shows the bottom of the inner sash of
a double-hung window, but without the tapered
sill it could also be the outer double-hung sash or
the sides of a sliding window or door. Cut a 1/8"
x 1/4" (3mm x 6mm) groove in the bottom of the
sash and insert a WS10. If a 1/4" gap would be
more appropriate, use WS11.
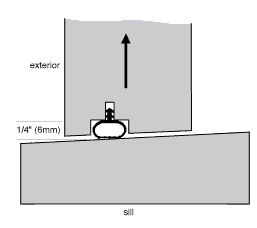
WS11 IN BOTTOM
When clearances are smaller than the 1/4" (6mm)
required for standard mounting of WS11, cut a
wide shallow groove to hold the tubular head of
the seal, and cut a 1/8" x 1/4" (3mm x 6mm)
groove for the tail of the seal. This technique
allows close clearances without overcompressing
the seal and is useful when the gap is not uniform.
The same technique can be used with WS10.
