 General Information
Green Roofs
Rainwater Harvesting
Ponds and Wetlands
Energy-Efficient Building
Design Principles
Weatherseals
Pricelist
Corner-Grooving System
Caulkable Cornerseals
Adjustable Door Bottom
Automatic Door Bottom
Jamb Seals
Bottom Seals
Center Seals
Sliding Seals
Techniques
Building Gaskets
Glazing Gaskets
Timber Glazing
Air-Vapor Films
Attic Access
Ventilation
Sealants
Shim Screws
Wood Repair
Documents
Waterproofing

WEATHERSEALS: CORNER-GROOVING SYSTEM
The WS98 Corner-Grooving Machine quickly grooves both new and existing wood door or window jambs to hold silicone rubber corner-tubeseals. It consists of a quality high-speed motor mounted within an injection-molded plastic tool body with a replaceable aluminum base. The base is “V”-shaped to fit into rabbeted jambs, and the motor is mounted at a backward angle that permits grooving all the way into the corners where jambs meet headers or sills. A crush-resistant vacuum hose threads into the hollow tool body to suck debris from the groove and keep the site clean.

WS98 Corner-Grooving Machine
We offer five different sizes of superior-quality, thin-wall silicone rubber corner tubeseals to assure perfect sealing of any gap from 0 to 3/8” with virtually no noticeable increase in closing pressure. These seals feature our time-tested, friction-grip foot designed to fit an 1/8” wide straight groove that is cut with inexpensive high-speed-steel or solid-carbide spiral router bits. Since the depth and angle of the cut are not very critical, it’s almost impossible to ruin the jamb, even if the bit is not set precisely, the operator is momentarily distracted, or the machine runs over an area with a thick accumulation of paint. Our friction-grip seals won’t easily shrink away from corners and ends, and will effectively keep water away from the unfinished wood inside the groove.
| cross-section | |||||
| designation | WS32 | WS33 | WS34 | WS35 | WS36 |
| gap range | 0 - 1/8" | 1/16" - 3/16" | 1/8" - 1/4" | 3/16" - 5/16" | 1/4" - 3/8" |
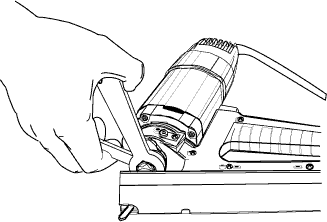
INSTALLING THE BIT: Always use our custom-made carbide bits since standard 1/8” carbide spiral bits are too short. It is not necessary to remove the motor from the handle to install or remove bits. Loosen the collet nut, slide the bit into the collet, hand tighten the collet nut so that it grips the bit gently, and then slide the bit in or out so that the tip of the bit extends approximately 1-3/4" from the collet nut. Then use both wrenches to securely tighten the nut: one wrench grips the shaft and the second tightens the nut.
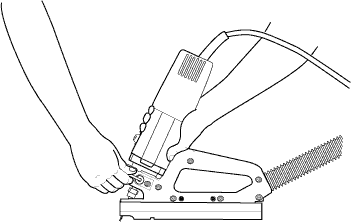
The bit should be set to cut a groove 1/4" deep. To check the cutting depth, draw a line 1/4" from the edge of a straight piece of wood, place the wood against the base of the machine, and verify that the bit just touches the line. If the bit has been installed as above, the cutting depth can be adjusted with a cam that causes the motor to slide up and down. Loosen the screw on the front of the motor clamping ring using the alien key on the motor cord, insert the allen key into the black screw on the side of the clamping ring, turn the screw to adjust the bit depth, and re-tightening the front screw to lock the motor in place.

Insert the bit in the collet so that it extends approximately 1-3/4" from the collet nut, then tighten the collet nut with the two wrenches provided.

Loosen the clamping screw and turn the adusting screw with the allen wrench provided.
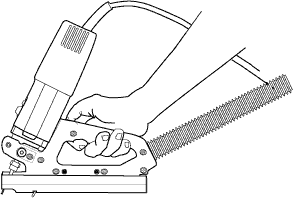
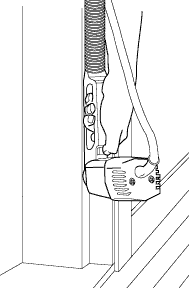
USING THE TOOL: Turn on the vacuum, or use a vacuum that automatically starts with the tool. Beginning at the midpoint of either side, place the tool base in the corner of the jamb and depress the button on the handle to extend the stabilizing pin from the base and lift the bit away from the wood. Turn on the motor and slowly release the push button to plunge the bit into the wood. Push at a slow but constant speed and cut a groove all the way into the top corner. Turn off the motor, depress the handle button to withdraw the bit from the groove, reverse the direction of the machine, and insert the bit into the beginning of the groove you just made. Then turn the motor on and cut all the way to the bottom corner. Repeat the procedure on the other side and top (and also the bottom when grooving an awning or casement window).

Push the button in the handle so that the
standoff pin protrudes from the base.

Starting in the center, slowly release
the
button and cut up to the top.

Then reverse the tool, starting at the
center, and cut to the bottom.
HINTS AND PRECAUTIONS:
• Always use this machine with a portable vacuum: besides controlling dust, the vacuum helps remove the chips from the groove which saves time and prolongs bit life. Both 1-1/4" and 2-1/4" end fittings are provided: select the one that fitts your vacuum and press it firmly into the vacuum hose cuff. Unscrew the vacuum hose occasionally and blow out any large debris trapped in the body of the cornergrooving machine.
• Always push the tool when cutting: never pull backwards.
• Start the motor before plunging the bit into the wood and stop the motor before withdrawing the bit from the wood. Use the push button on the handle to smoothly plunge and withdraw the bit.
• Wax the tool bottom occasionally for smooth operation.
• When reversing the direction of the machine, don’t overlap the cut more than 1/2” since the kerf may become too wide when it’s cut twice.
Avoid cutting deeper than necessary: the bit is more likely to break if it is extended too far.
• Never stretch tubeseals: before rolling them into the groove, first “tack” them in place every 6” by pressing with your finger.
• Since gaps are rarely identical on all sides of a door or window, don’t try to seal all the sides with one size of tubeseal. If necessary, you can even use two sizes of tubeseals on the same side: just cut off some of the foot from the smaller seal so its tube can be inserted inside the tube of the larger seal. Always butt joint cornerseals at turns, since butt joints seal better than miters and they make size changes less visible.