 General Information
Green Roofs
Rainwater Harvesting
Ponds and Wetlands
Energy-Efficient Building
Waterproofing
EPDM Roofing
Preparation
Basic Procedure
Multiple Walls
Details
Folded Inside Corners
Molded Inside Corners
Taped Inside Corners
Molded Outside Corners
Taped Outside Corners
Posts
Skylights
Outside Edges
Inside Edges and Sills
Edge Transitions
Pipe Boots
Curved Penetrations
Roof Drains
Scupper Drains
Overlap Seams
Butt Seams
Edges
Coverings
Components
Acrylic Roofing
Documents

EPDM ROOFING: BASIC PROCEDURE
The following illustrations describe how EPDM rubber can be used to waterproof a simple shed roof with three sides open and a fourth side intersecting a wall. Although the procedures show the rubber fully adhered to the roof surface, when the rubber is to be covered with materials weighing at least five pounds per square foot such as floating wood decks, concrete pavers, gravel, or soil, it is only necessary to adhere the first few feet in from the edges, up the walls, and over the edges.
For safe delivery, we supply all rubber roof sheets folded and boxed. Since the rubber weighs about one-third of a pound per square foot, sheets up to 500 square feet can be carried by two people, but larger sheets can be quite heavy and difficult to manage. One solution is to rent a light-duty type crane (the type used to install commercial signs are relatively inexpensive). When using a crane, make certain the spot where the rubber is set down can handle the weight!
STEP 1: Using a pencil, mark the desired
rubber perimeter on the wall and roof edges.
STEP 2: Apply Termination Tape to the wall just
below the line.
Do not remove the protective paper.
STEP 3: Apply Termination Tape to the roof edges
just
above the lines. Do not remove the protective paper.
STEP 4: Apply Termination Tape to connect the wall
and
roof tapes
so the entire rubber perimeter is sealed.
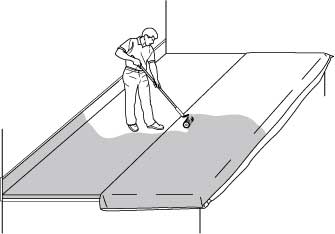
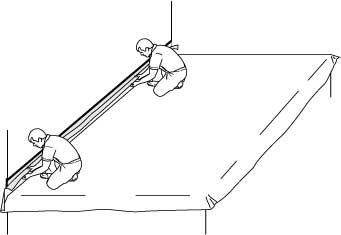
STEP 5: Pull the rubber from the
shipping box and drag it across the roof.
STEP 6: Unfold the sheet by pulling it across the roof.
Flipping the sheet will force air underneath so it floats into place.
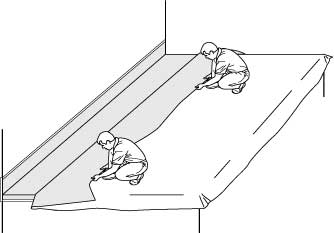
STEP 7: After the sheet is in postion, fold back the edge
adjacent to the wall. Wait at least an hour for the rubber to “relax”.
STEP 8: Pull back the folded edge adjacent to the wall,
taking
care not to move the remainder of the sheet.
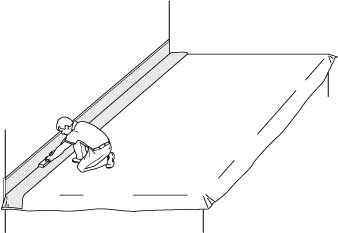
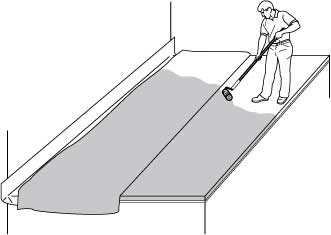
STEP 9: Using a paint roller, apply Bonding
Adhesive to the exposed rubber, roof, and wall.
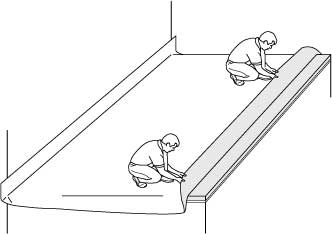
STEP 10: After the adhesive is dry, carefully push back the
sheet. To prevent wrinkles, avoid creasing in the leading edge.
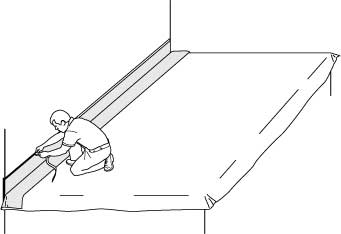
STEP 11: Using a clean wood board, press the rubber
firmly into the corner where the roof and wall meet.
STEP 12: Peel the protective paper off the Termination
Tape on the wall to expose the tacky tape surface.
STEP 13: Slowly lift the sheet onto the wall,
pressing it into the adhesive and finally into the tape.

STEP 14: Firmly roll the rubber on
the wall to insure a good bond.
STEP 15: Pull back the opposite edge
to expose the other half of the roof.
STEP 16: Apply Bonding Adhesive to the
exposed
parts of the rubber and the roof.
STEP 17: After the adhesive is dry, carefully push
back the
sheet. To prevent wrinkles, avoid creasing in the leading edge.
STEP 18: Using a large roller or push broom, apply
pressure to the surface of the rubber to assure proper bonding.
STEP 19: Reach under the overhanging rubber and
strip the protective paper from the Termination Tape.
STEP 20: Slit the corners of the rubber with a utility
knife so the overhanging rubber can drop into place.
STEP 21: Form the rubber around the roof
edge and press the rubber into the tape.

STEP 22: Firmly roll the rubber at the
roof edge to insure a good bond.

STEP 23: Clean the slit corners with
toluene,
naptha, or white gasoline.
STEP 24: Seal the slit corners with
Uncured
Laminate Tape. See EDGE TRANSITIONS.
STEP 25: Screw Wall Termination Bars
through the rubber and Termination Tape.
STEP 26: Apply Silicone Caulk for EPDM to
the back of the Drip Edge Termination Bars
STEP 27: Screw the Drip-Edge Termination
Bars through the rubber and Termination Tape.
STEP 28: Screw short lengths of Wall Termination Bars to
connect the bars on the wall and edges, sealing the perimeter.
STEP 29: Carefully trim the rubber to the underside
of the termination bars with a sharp utility knife.