 General Information
Green Roofs
Rainwater Harvesting
Ponds and Wetlands
Energy-Efficient Building
Waterproofing
EPDM Roofing
Preparation
Basic Procedure
Multiple Walls
Details
Folded Inside Corners
Molded Inside Corners
Taped Inside Corners
Molded Outside Corners
Taped Outside Corners
Posts
Skylights
Outside Edges
Inside Edges and Sills
Edge Transitions
Pipe Boots
Curved Penetrations
Roof Drains
Scupper Drains
Overlap Seams
Butt Seams
Edges
Coverings
Components
Acrylic Roofing
Documents

EPDM ROOFING: EDGES
All edges of an EPDM roofing system must be sealed and mechanically clamped to prevent air and water entry during windy conditions. Air flowing over a roof creates both positive and negative pressure regions which force air and water into the smallest openings. Most membrane roof leaks can be traced to the failure to seal and secure roof edges. In high winds, membranes that have not been adequately terminated have been ripped off of roofs.
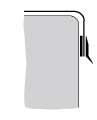
drip-edge
termination
The simplest way to fasten and seal an external edge of a rubber roof is to bend the rubber over the roof edge and clamp it with our Drip-Edge Termination Bar, a sturdy black aluminum bar with an angled bottom that forces water to drip away from the fascia instead of down it. The roof edge must be formed to a 1/2” minimum radius to avoid stretching the rubber which will shorten its life. Apply Termination Tape, a tacky strip of uncured butyl rubber, to the fascia to prevent air and water entry behind the rubber. Remove the release paper from the tape, fold the rubber over the edge, and press the rubber firmly into the tape. Apply a thin bead of our special silicone caulk to the back of a termination bar to prevent water from running behind the bar, and screw the termination bars through the rubber and tape and into the fascia.
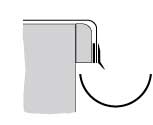
drip-edge
with gutter
If a gutter is to be installed at the roof edge, first attach a spacer block made of rot-resistant wood or plastic flush with the roof surface. The edge termination procedure is the same as above: form a 1/2” minimum radius, apply Termination Tape, remove the release paper from the tape, fold the rubber over the edge, press the rubber firmly into the tape, apply caulk to the back of a Drip-Edge Termination bar, and screw the termination bars through the rubber and tape and into the spacer block. This detail will assure that the water running off the roof runs into the gutter, even if the back edge of the gutter is spaced somewhat from the fascia by the gutter mounting brackets. The bottom of the drip edge should always be above the flood line of the gutter to prevent capillary draw if there is gutter blockage.

wall termination
Where rubber turns up a wood or stucco wall, it can be secured with a Wall Termination Bar, a sturdy black aluminum bar with a rectanglar cross-section. Before applying the bar, the rubber should always be adhered as described in our basic installation procedures. The edge termination procedure is similar to that used for drip edges: apply Termination Tape to the wall to prevent air and water entry behind the rubber, remove the release paper and press the rubber firmly into the tape, and screw the termination bar through the rubber and tape and into the wall. Then trim any excess rubber and apply a heavy bead of caulk between the top of the termination bar and the wall. The thin profile of Wall Termination Bars will not usually create a noticeable bulge when siding or other wall coverings overlap the rubber edge. However, if a wall covering is to be applied immediately and it has a continuous bottom trim detail that can securely clamp the rubber to the wall, it may be possible to eliminate the Wall Termination Bar and only use Termination Tape.
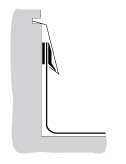
wall termination
with cap and reglet
When rubber is to be terminated on a masonry wall, such as the side of a brick chimney, it may be more appropriate to use a Drip-Edge Termination Bar as shown in the second wall-termination illustration. Cut a groove into the masonry above the bar. Form an aluminum cap-flashing as shown, hook the flashing under the lip of the termination bar, insert the aluminum into the groove, wedge it in place, and seal the groove with polyurethane caulk.
We can provide custom design guidance for situations that don’t fit into one of the above simple categories. For example, the illustration at the right shows one method for flashing and terminating an EPDM membrane on a flat roof that intersects a descending sloped shingle roof, such as would be the case on a mansard roof. During construction, the flat roof sheathing is projected outward over the sloped roof and a vertical filler strip is fastened to connect the two roofs. When the shingles are laid, a metal flashing strip is fastened over the topmost shingle and bent up the vertical filler strip (typically, the metal is covered with a decorative top shingle). The rubber is then taped and clamped over the metal flashing using Termination Bar Tape and a Wall Termination Bar.
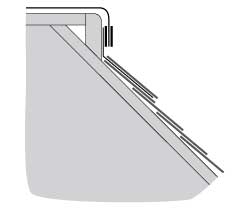
transition between flat roof and sloped roof